23 Gallon Rear Main Fuel Tank
Instructions
]Disconnect your factory fuel tank by unhooking all hoses, lines and wire from tank. Remove the factory tank. Once the tank is removed, also remove the four frame-mounted fuel tank support brackets.
Cut the plug-style terminal off the end of the fuel sending unit wires and install the ring-style terminal leads that are supplied with the kit.
Install the supplied sending unit into the new fuel tank. To do this, align the holes in the tank, gasket and sending unit and install four of the five provided sheet metal screws.
NOTE: You will use the fifth screw to attach the sending unit ground wire (black) in the following step.
Connect the ground wire lead (black) by attaching it to the fifth sending unit screw and installing this screw in the remaining sending unit mounting hole. Connect the power wire (orange) to the center nut on the sending unit.
Raise the tank into position being careful not to catch or pinch the sending unit wires.
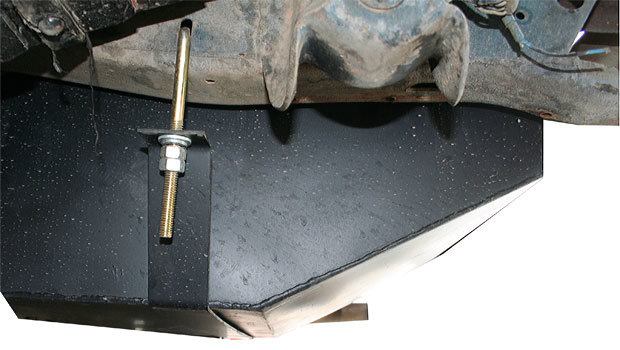
Holding the tank in position, attach the supplied strap and j-bolts to hold the tank in place.
NOTE: You will use the slotted holes located on the outside of the frame just in front of the leaf spring shackles to attach the j-bolts (see Image 1 on following page). Be sure that the strap is tightened securely before letting go of the tank.
Install the fuel filler hose and fuel vent hose being sure to tighten clamps completely. Connect fuel line to fuel pick-up on tank. See Image 2 on following page for line locations.
NOTE: This tank is welded together. Therefore there will inevitably be small amounts of slag left in the tank. You MUST install the included in-line fuel filter in a convenient location between the fuel tank and fuel pump to filter out this debris in order to prevent potential fuel delivery issues .
Add fuel to the tank and check all of your hoses and lines for any leaks.
CAUTION: It is recommended that the new tank be completely flushed out prior to installation to eliminate any possible welding debris left in the tank during manufacture.
Do not weld or torch on the fuel tank!

More Ways To Get Help & Learn More