Heater Blower Motor and Squirrel Cage Upgrade #6466
Get the most out of your heating system with this step-by-step instruction guide on how to install the upgraded heater motor and squirrel cage.
This is a step by step instruction guide on how to install the upgraded heater motor and squirrel cage. It is recommended that a high amp alternator be used as this motor does have a higher power draw than the factory motor. It will still work with the factory alternator, but when you begin using headlights, winch, etc., you will notice severe sluggishness.
Using the upgraded squirrel cage is bigger in diameter than the factory cage, therefore enlarging the existing hole in your heater box will be required for proper fitment. You can use the factory squirrel cage if you prefer, but it will be less efficient and not produce as much air flow. It is recommended to remove the heater box for this install.
RELATED PRODUCT:

Instructions
Remove Heater Box: Disconnect and plug heater hoses that connect to the heater core under the hood. Prepare to have some coolant spill out. Next, remove the two heater cables that connect to the box underneath the dash, as well as the two heater duct hoses that connect to the top of the box in the same location. Going back under the hood, remove the four nuts that connect the heater box to the firewall. The heater box should now be easily removed. Remove the existing heater fan and squirrel cage from the heater box assembly.
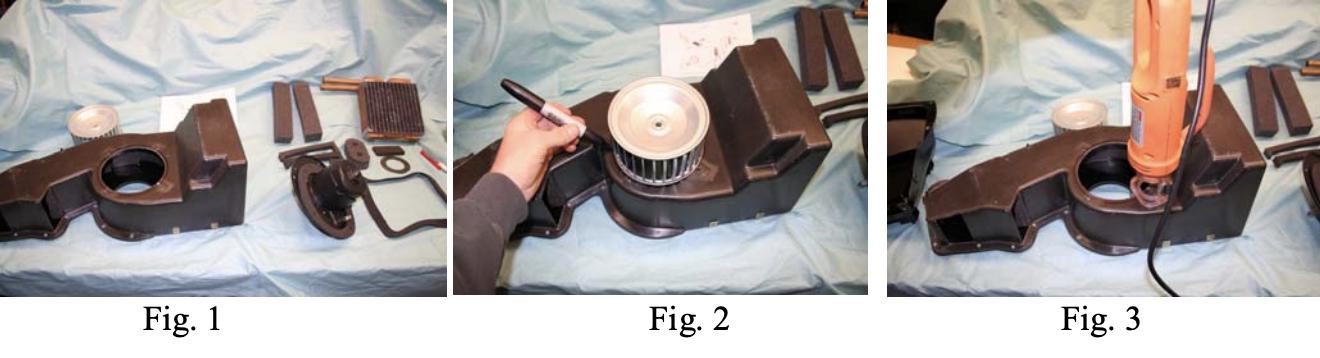
Installing Motor and Squirrel Cage: If you haven’t recently replaced the heater core, now is a good time to do it. Also, a heater box seal kit would be in order if it has never been replaced (fig 1). Take the new squirrel cage and place it over the existing opening. Use it as a guide and draw a line around the squirrel cage (fig 2). Next, take a high speed cutoff wheel, dremel tool, or whatever else you may have and cut along the line you have drawn (fig 3).
Drill Holes for Motor: Drill pilot holes (once again using the motor as a template) and slide the existing screw clips over the holes. NOTE: Be sure to check for adequate clearance between squirrel cage and heater box “flapper.” Install the screws (fig. 4). Using one of the screws, install the old ground wire strap or make a new one (fig. 5) and screw it into the motor housing. Mount the other end of the wire to the metal case of the heater box.
Finalizing Installation: Reinstall the completed heater box assembly (fig. 6), reverse of the way it was uninstalled. Hook up the existing power wire to the male spade on the new motor and test the fan on high and low speeds. Also, be sure to check coolant level, as more than likely coolant was spilled.
Congratulations, YOU'RE DONE!
More Ways To Get Help & Learn More