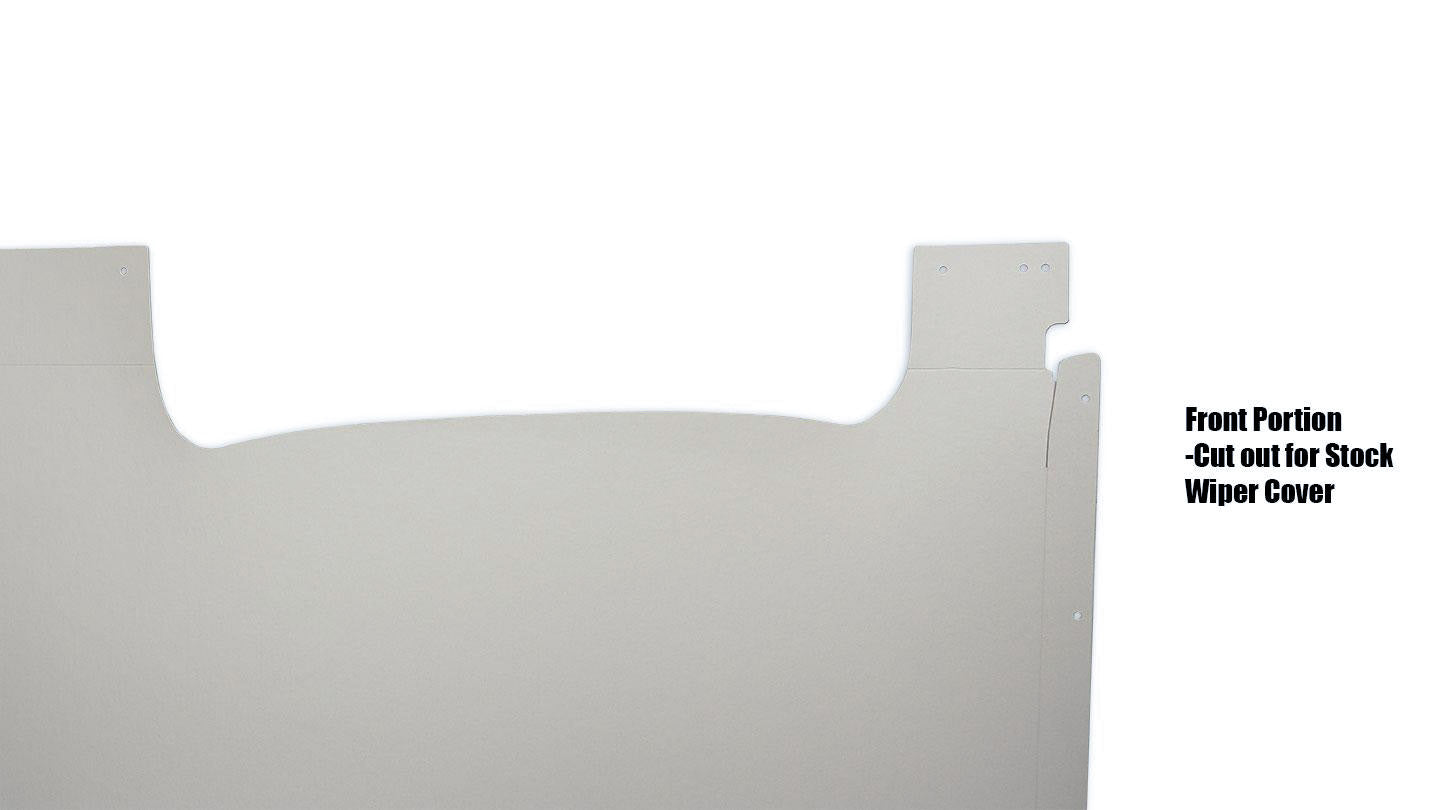
Parchment Headliner for Electric Wipers, 69-77 Ford Bronco

69-77 Ford Bronco


Condition: New
Part Number: 2245
star star star star star
Price: $139.95


Fits: 1969-77 Ford Bronco

New Parchment Headliner for 69-77 Classic Ford Broncos with Electric Wipers. This headliner is a direct replica of the original and includes both front and rear portions. Don't forget the Headliner Support Bow while you're at it.

Note: The holes in the headliner for the mounting screws are in different locations as compared to factory, and thus will require drilling new holes. This is done purposely because often the original holes in the hard top strip out, making it nearly impossible to install the new headliner.

Reviews

Average Customer Rating: star star star star star (2 customer reviews)

Submit Your Own Review

Review by: stevens, Dec 19, 2017   star star star star star

Finally opened the box! FAST SHIPPING!!!! GREAT ITEM !!!!!! THANK YOU!!!!!!!!!!

Review by: mark, May 3, 2020   star star star star star

The previous owner of my 1973 Bronco had glued a brown material of some sort to the inside of the top and sides as a sort of headliner. When I finally got around to taking it out, I was left with a bunch of residual glue and material that took some serious scrapping/sanding to remove. Once I had the top pretty clean, I repainted it and decided to install one of Tom's Bronco Parchment White headliners. Before I installed the headliner, I did buy some lightweight insulation from the local hardware store and used 3M 90 adhesive spray to install strips on the inside of the top that would be covered by the headliner. I figured this was an easy way to provide some heat and noise insulation to the top. It was well worth the additional hour and $40. Per the instructions, I installed the front piece of the headliner first. Since the front piece is the smaller of the 2 pieces, it was easy enough to install by myself. A note of caution, the headliner is a type of cardboard and needs to be 'handled' gently. Since the headliner comes from the factory 'rolled' up, I did unroll it the night before I installed it and held it sort of flat with some weights. Note, the surface of the headliner is not indestructible and can be easily marred. So anything you put against the headliner be sure to protect it with a rag or something. Also, as you bend the tabs on the sides into position, be sure to do it in stages. If you try to bend them the required 90 degrees in one motion, the backside of the headliner will start to crack a little. After I got the front piece installed, I started on the back piece which is about twice as big as the front. Soon after I started on the back piece, my wife came out to check on my progress and offered to help. Believe me, an extra set of hands is definitely helpful. I did have to drill new mounting holes once I had the new headliner in place. As I mentioned before, be careful fitting the headliner in place. I got a little over-eager on the back tab and ended up creasing a small area. Since the headliner is white, any crease is easily visible. While I was beating myself up about the mistake, my wife offered a good piece of advice. She said, "Hey, you can barley see it. Besides, what is a DIY project without a couple of flaws? Consider it your signature on the project. Kind of like when an artist signs their finished painting." Anyway, I was very happy with the finished look and the new chrome bow that covers where the front and back piece meet really gives the whole thing a super finished look. Hope this helps.

Prop. 65 Warning for California Residents

WARNING: This product may contain chemicals known to the state of California to cause cancer, birth defects, or other reproductive harm. Learn more